
Christmas fudge has a way of making any holiday gathering feel extra special, don’t you think? For me, it’s the scent of peppermint and sweet white chocolate that instantly transports me back to cozy childhood Christmases, helping my mom stir batches of this delightful treat. This year, I’m so excited to share my favorite recipe for easy Christmas fudge with you. It’s incredibly simple to make, even for beginners, and the creamy, swirled colors are just stunning. Get ready to create a festive showstopper that will have everyone asking for the recipe. Let’s get cooking!
Why You’ll Love This Christmas Fudge
This recipe is a holiday game-changer! Here’s why you’ll adore making and sharing this festive treat:
- It’s incredibly easy Christmas fudge, perfect for even novice bakers.
- The no-bake method means less fuss and more fun.
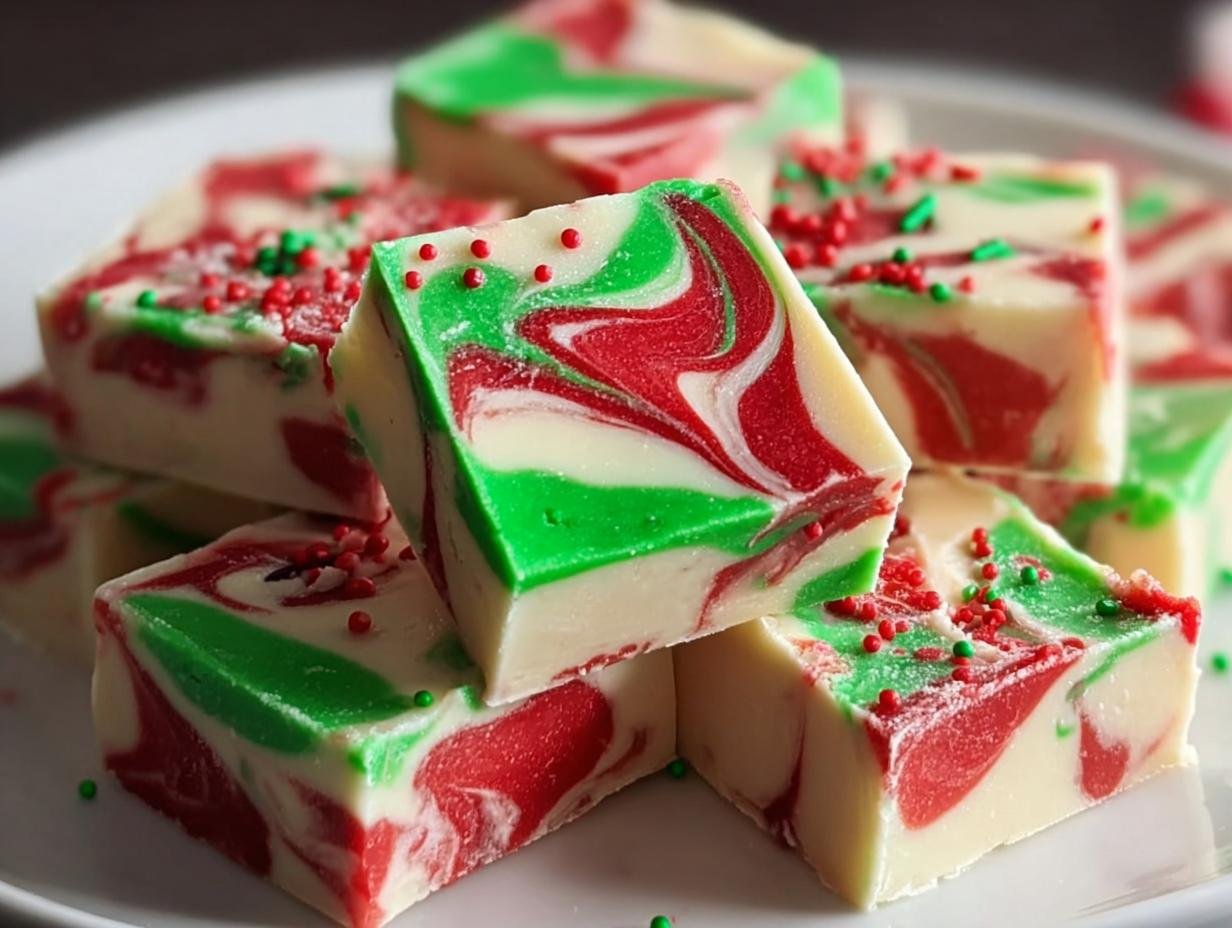
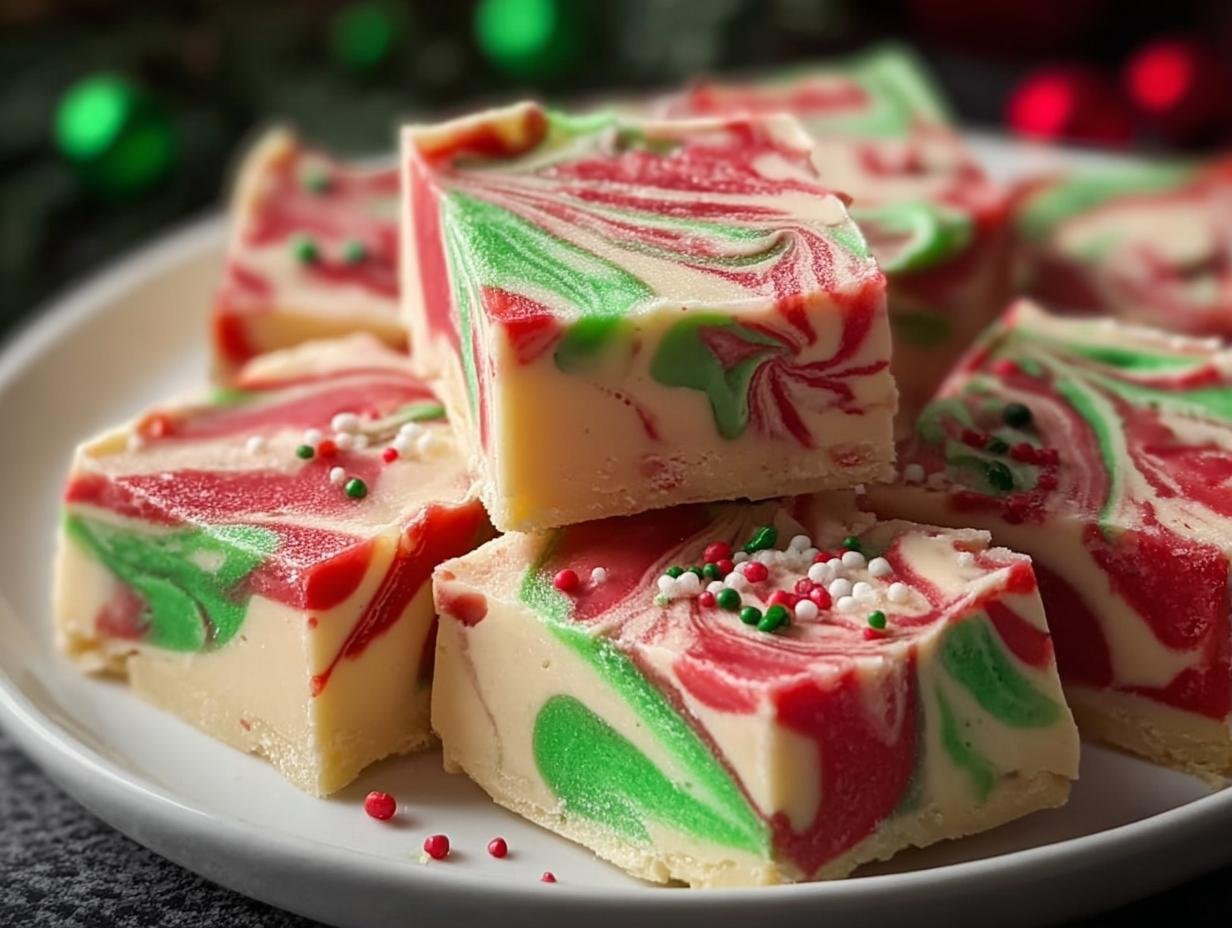
- Beautiful red and green swirls make it visually stunning for any table.
- The creamy white chocolate and peppermint flavor is a classic holiday delight.
- It’s a fantastic addition to your collection of holiday fudge recipes.
- Whip up a batch in minutes for last-minute gifting or parties.
- The sweet aroma fills your kitchen with festive cheer.
- It’s a guaranteed crowd-pleaser that everyone will rave about.
Ingredients for Easy Christmas Fudge
Gathering these simple ingredients is the first step to creating a beautiful white chocolate Christmas fudge. I love how few items are needed for such a show-stopping dessert!
- 3 cups (525g) white chocolate chips – these form the creamy base of our fudge.
- 1 can (14 ounces/396g) sweetened condensed milk – this is key for that smooth, melt-in-your-mouth texture.
- 2 tablespoons (28g) butter, softened – it adds richness and helps everything melt beautifully.
- 1/2 teaspoon peppermint extract – for that classic festive flavor that pairs so well with white chocolate.
- 1/2 teaspoon green food coloring (gel preferred) – gel gives the most vibrant color without making the mixture watery.
- 1/2 teaspoon red food coloring (gel preferred) – for those lovely red swirls.
- 2 tablespoons holiday sprinkles (optional) – the perfect finishing touch for extra sparkle and fun!
How to Make Christmas Fudge
Now that you have all your ingredients ready, let’s dive into making this delightful Christmas fudge. It’s truly a straightforward process, and I’ll walk you through each step to ensure success. You’ll be amazed at how quickly you can create this beautiful, festive treat right in your own kitchen. This guide will show you exactly how to make Christmas fudge that looks and tastes professional, even if you’re new to candy making.
Step 1: Prepare the Pan
First things first, grab an 8×8-inch square pan. I like to line mine with parchment paper, making sure there’s plenty of overhang on two sides. This overhang acts as handy handles, allowing you to easily lift the entire block of fudge out once it’s set. It makes cutting so much cleaner!
Step 2: Melt the Base
In a large microwave-safe bowl, combine your white chocolate chips, sweetened condensed milk, softened butter, and peppermint extract. Microwave this mixture in 30-second intervals, stirring well after each one. Keep going until it’s completely smooth and glossy. This method is fantastic for a quick Christmas fudge!
Step 3: Prepare Color Mixtures
Once your white chocolate base is smooth, it’s time to add those festive colors! Carefully scoop about half a cup of the melted fudge into a small separate bowl. Add your red food coloring and stir vigorously until the color is evenly distributed. Repeat this process with another half cup of fudge in a different bowl, this time adding the green food coloring.
Step 4: Assemble and Swirl
Pour the remaining white fudge mixture into your prepared pan, spreading it evenly. Now, drop dollops of the colored red and green fudge randomly over the white base. Grab a knife or a skewer and gently swirl the colors together using just a few figure-eight motions. Be careful not to over-swirl, or you’ll muddy the colors. This creates that beautiful, festive fudge for Christmas look!
Step 5: Chill and Cut
If you’re using sprinkles, sprinkle them over the top while the fudge is still soft. Then, carefully place the pan in the refrigerator for at least 2 hours, or ideally overnight, until it’s completely firm. Once set, use the parchment paper overhang to lift the fudge out of the pan. For the cleanest slices, use a sharp knife, wiping the blade with a warm, damp cloth between each cut. This is key to the best Christmas fudge recipe.
Pro Tips for the Best Christmas Fudge
I’ve learned a few tricks over the years that really elevate this holiday treat. Following these tips will help you create the most delicious and visually appealing fudge every time.
- Always use good quality white chocolate chips; they make a huge difference in meltability and taste.
- Don’t over-microwave the chocolate, as it can seize and become grainy. Stirring frequently is key.
- When swirling, less is more! A few gentle motions create beautiful patterns without muddying the colors.
- Using gel food coloring is a game-changer for vibrant colors without adding excess liquid.
What’s the secret to perfect Christmas Fudge?
The secret lies in the gentle melting of the white chocolate mixture and careful swirling. This isn’t just any fudge; it’s a recipe that honors the tradition of a truly classic Christmas fudge recipe.
Can I make Christmas Fudge ahead of time?
Absolutely! You can easily prepare this fudge a day or two in advance. Once it’s completely set, store it in an airtight container at room temperature until you’re ready to serve or gift it.
How do I avoid common mistakes with Christmas Fudge?
The biggest pitfalls are over-heating the chocolate, which can cause it to seize, and over-swirling the colors, which muddies the design. Work quickly and use gentle motions for the best results.
Best Ways to Serve Christmas Fudge
Once your beautiful Christmas fudge is ready, the fun really begins! It’s perfect for adding a festive touch to any holiday dessert spread. Try serving it alongside a warm mug of spiced cider or a rich hot chocolate – the creamy sweetness is a wonderful contrast. For cookie platters, it adds a different texture and a pop of color. And of course, this fudge makes for wonderful Christmas fudge gifts! Package small batches in festive tins or cellophane bags tied with ribbon for a thoughtful homemade present that anyone would be thrilled to receive.
Nutrition Facts for Christmas Fudge
Here’s a breakdown of the nutritional information for one square of this delicious Christmas fudge, making it easy to track your holiday treats:
- Calories: 274 kcal
- Fat: 14g
- Saturated Fat: 9g
- Protein: 4g
- Carbohydrates: 33g
- Fiber: 0g
- Sugar: 33g
- Sodium: 73mg
Nutritional values are estimates and may vary based on specific ingredients used in your easy Christmas fudge.
How to Store and Reheat Christmas Fudge
Once your beautiful Christmas fudge is completely cool and firm, proper storage is key to keeping these easy holiday fudge treats tasting their best. I usually let mine sit out for a bit longer after chilling, just to ensure there’s no residual moisture before I wrap it up. For the freshest fudge, store it in an airtight container. If you plan to enjoy it within a few days, the refrigerator is perfect – it will keep well for about 3 to 4 days. For longer storage, you can absolutely freeze it! Wrap individual pieces tightly in plastic wrap, then place them in a freezer-safe container or bag, where they’ll stay delicious for up to 3 months. When you’re ready to enjoy frozen fudge, simply thaw it overnight in the refrigerator. There’s no need to reheat it, as it’s best served chilled or at room temperature!
Variations of Christmas Fudge You Can Try
While this recipe is fantastic as is, I love experimenting with different flavors and methods to keep things exciting! If you’re looking for new ways to enjoy this classic, consider these delicious variations. They’re all pretty simple ways to switch up your holiday baking and offer something a little different.
- Peppermint Christmas Fudge: For an extra burst of holiday cheer, you can double the peppermint extract in the base mixture. This creates a wonderfully intense peppermint Christmas fudge that’s perfect for those who love a strong minty flavor.
- Christmas Fudge with Nuts: If you enjoy a bit of crunch with your creamy fudge, adding chopped nuts is a must! Fold in about 1/2 cup of toasted walnuts, pecans, or even almonds into the white chocolate base before pouring it into the pan. This adds a lovely texture to your Christmas fudge with nuts.
- Dairy-Free Christmas Fudge: You can easily make this recipe dairy-free! Simply swap the white chocolate chips for a good quality dairy-free white chocolate alternative and use full-fat coconut milk or a dairy-free condensed milk instead of the regular condensed milk and butter.
- Spiced Christmas Fudge: For a warm, cozy twist, add a pinch of cinnamon and nutmeg to the white chocolate base. This subtle spice complements the sweetness beautifully and adds another layer of festive flavor.
Frequently Asked Questions About Christmas Fudge
Is this a true fudge recipe, or more like candy?
This recipe is often called fudge because of its smooth, creamy texture, but technically, it’s a no-bake confection that relies on condensed milk and chocolate rather than the sugar crystallization process of traditional fudge. It’s a fantastic shortcut to delicious Christmas candy fudge!
Can I use milk chocolate or dark chocolate instead of white chocolate?
You absolutely can! While this recipe is designed for white chocolate to get those vibrant swirls, you can substitute milk or dark chocolate chips. Just be aware that the melting and swirling might behave slightly differently, and the colors won’t show up as brightly against darker chocolate. For a different chocolate experience, you might enjoy our spaghetti with mushroom sauce.
How do I get really sharp edges when cutting my Christmas Fudge?
Achieving those clean cuts is all about the knife! Make sure your fudge is completely firm. Use a long, sharp knife, and preferably, dip it in hot water and wipe it dry between each cut. This helps the knife glide through the fudge smoothly, preventing it from dragging and smearing the colors. For more baking tips, check out our guide on the beauty of food.
What are some other festive additions I can make to this Christmas Fudge?
Beyond sprinkles, you could try adding a pinch of edible glitter for extra sparkle, or even some crushed peppermint candies on top for an added crunch and minty kick. A swirl of melted dark chocolate can also add a nice visual contrast and flavor complexity to your festive treat. If you’re looking for other festive desserts, consider our cinnamon orange jam linzer cookies.
Print
Christmas Fudge: 5 Minute Festive Delight
- Total Time: 2 hours 10 minutes
- Yield: 16 squares 1x
- Diet: Vegetarian
Description
This Christmas fudge recipe creates a festive and delicious no-bake holiday dessert. It features a creamy white chocolate base with vibrant red and green swirls and a hint of peppermint, perfect for Christmas.
Ingredients
- 3 cups (525g) white chocolate chips
- 1 can (14 ounces/396g) sweetened condensed milk
- 2 tablespoons (28g) butter, softened
- 1/2 teaspoon peppermint extract
- 1/2 teaspoon green food coloring (gel preferred)
- 1/2 teaspoon red food coloring (gel preferred)
- 2 tablespoons holiday sprinkles (optional)
Instructions
- Line an 8×8-inch square pan with parchment paper, ensuring overhang on two sides for easy lifting.
- In a large microwave-safe bowl, combine white chocolate chips, sweetened condensed milk, butter, and peppermint extract.
- Microwave for 30 seconds, stir, then continue heating in 30-second intervals, stirring between each, until smooth.
- Place 1/2 cup of the mixture in a small bowl, add red food coloring, and stir vigorously.
- Repeat with another 1/2 cup of mixture in a separate bowl, adding green food coloring and stirring.
- Pour the remaining white fudge mixture into the prepared pan.
- Drop dollops of the red and green fudge randomly over the white base.
- Gently swirl the colors together with a knife or skewer using 3-4 figure-eight motions. Do not over-swirl.
- Sprinkle with holiday sprinkles if desired while the fudge is still soft.
- Refrigerate for at least 2 hours, or preferably overnight, until completely firm.
- Lift the fudge from the pan using the parchment paper.
- Cut into squares with a sharp knife, wiping the blade with a warm, damp cloth between cuts for clean edges.
Notes
- Use high-quality white chocolate chips for the best texture.
- Melt chocolate in short intervals (30 seconds) and stir between each to prevent seizing.
- Work quickly once the fudge is melted as it begins to set immediately.
- Gel food coloring provides more vibrant colors without thinning the mixture.
- For the cleanest cuts, dip your knife in hot water and wipe dry between slices.
- Store fudge in an airtight container in the refrigerator for up to 5 days, or freeze for up to 3 months.
- Prep Time: 10 minutes
- Cook Time: 0 minutes
- Category: Dessert
- Method: No-Bake
- Cuisine: American
Nutrition
- Serving Size: 1 square (1/16th of recipe)
- Calories: 274 kcal
- Sugar: 33g
- Sodium: 73mg
- Fat: 14g
- Saturated Fat: 9g
- Unsaturated Fat: 4g
- Trans Fat: 0g
- Carbohydrates: 33g
- Fiber: 0g
- Protein: 4g
- Cholesterol: 19mg


Leave a Reply